Social Items

BLOGGER TIPS लेबलों वाले संदेश दिखाए जा रहे हैं. सभी संदेश दिखाएं
दोस्तो क्या आप अपनी एक normal photo को luxury fashion portrait, cinematic movie-poster या red neon AI portrait में बदलना चाहते हैं?


दोस्तो आज के AI image generators में यह काफी आसानी से किया जा सकता है, लेकिन एक problem अक्सर सामने आती है। AI face को बदल देता है, hairstyle अलग कर देता है, skin tone बदल देता है या lighting और background को वैसा नहीं बनाता जैसा हम चाहते हैं।

इसका सबसे अच्छा solution है एक detailed AI portrait prompt।

एक professional prompt में केवल यह नहीं लिखा जाता कि “एक cinematic photo बनाओ।” बल्कि इसमें identity, face structure, outfit, pose, lighting, background, camera, color palette और unwanted elements तक define किए जाते हैं।

इस article में आपको 3 अलग-अलग professional AI portrait prompts मिलेंगे:

1. Luxury Crimson Fashion Portrait
2. Dark Amber Cinematic Portrait
3. Red Neon Aura Portrait

इन तीनों prompts को आप reference image के साथ इस्तेमाल करके अलग-अलग professional AI photo styles create कर सकते हैं।


AI Portrait Prompt क्या है?


AI portrait prompt एक detailed text instruction है जो AI image generator को बताता है कि portrait किस तरह दिखना चाहिए।

एक basic prompt:

«Create a realistic portrait of a man.»

बहुत limited information देता है।

लेकिन एक advanced AI portrait prompt में आप define कर सकते हैं:

  • - Face Identity
  • - Facial Structure
  • - Skin Tone
  • - Hairstyle
  • - Beard / Moustache
  • - Outfit
  • - Accessories
  • - Pose
  • - Expression
  • - Background
  • - Lighting
  • - Camera Lens
  • - Depth of Field
  • - Color Grading
  • - Image Quality
  • - Negative Constraints
  • - Aspect Ratio

यही वजह है कि detailed prompt से visual direction ज्यादा controlled हो सकती है।


3 AI Portrait Styles एक नजर में

Style| Main Colors| Lighting| Background| Best For
Luxury Crimson| Black + Crimson Red| Red Rim Light| Dark Red Gradient| Fashion & Instagram
Dark Cinematic| Black + Amber Orange| Orange Rim Light| Brown-Black + Amber Halo| Movie Poster
Red Neon Aura| Dark Red + Vibrant Red| Neon Backlight| Deep Dark Red| Viral Social Portrait

अब इन तीनों prompts को detail में देखते हैं।


1. Luxury Crimson Red Fashion Portrait AI Prompt


यह prompt एक premium luxury men's fashion editorial look के लिए बनाया गया है।

इसमें black ribbed sweater, rectangular sunglasses, silver hoop earring और deep crimson red studio background का combination है।

इस style का सबसे important visual element है red rim light।


Copy-Paste Prompt


Use the uploaded reference image as the exact identity of the person. STRICT IDENTITY LOCK:

Preserve 100% facial structure, skin tone, hairstyle, beard, facial features, age, body proportions, and identity from the uploaded reference image. Do not alter the face shape, eyes, nose, lips, jawline, beard style, hairstyle, or natural appearance.

OUTFIT: Premium black ribbed knit sweater, sleek black rectangular sunglasses, small silver hoop earring in one ear, modern luxury fashion styling.

POSE: Fashion portrait pose, head slightly lowered, face turned slightly sideways, confident expression, subtle smile, looking past the camera.

SCENE: Luxury studio fashion portrait with a deep crimson red gradient background, dark red cinematic backdrop, clean minimal composition, and a high-end professional photoshoot setup.

LIGHTING: Soft frontal beauty light with dramatic red rim light around the hair and shoulders, editorial studio lighting, cinematic shadows, high-contrast highlights, premium fashion campaign look.

CAMERA: Chest-up close portrait, 85mm lens, f/1.8 aperture, shallow depth of field, extreme facial detail, razor-sharp focus on the face.

STYLE: Luxury men's fashion editorial, viral Instagram portrait aesthetic, ultra-realistic, hyper-detailed skin texture, professional DSLR photography, premium color grading, magazine-quality portrait, hyper realistic, 8K, HDR, ultra sharp.

Aspect Ratio: 9:16

------------------------end

इस Prompt का Visual Look

इस prompt में तीन main colors dominate करते हैं:

Black + Crimson Red + Dark Red

Background में deep crimson gradient है और hair तथा shoulders के आसपास red rim light है।

इससे image में एक bold luxury fashion campaign जैसा appearance आता है।

Best For

- Instagram Portrait
- Instagram Reels Cover
- Fashion Content
- Creator Profile
- Luxury Personal Branding
- YouTube Shorts Thumbnail
- AI Fashion Photography


2. Dark Amber Cinematic Portrait AI Prompt


यह prompt पहले वाले fashion look से काफी अलग है।

इसमें red की जगह warm amber-orange lighting और dark brown-black background इस्तेमाल किया गया है।

इसका overall mood ज्यादा:

Dark + Mysterious + Cinematic + Premium

है।


Copy-Paste Prompt


ULTRA-REALISTIC CINEMATIC PORTRAIT PROMPT

Create an ultra-realistic, premium cinematic portrait of the same man from the uploaded reference image, with STRICT FACE LOCK and IDENTITY PRESERVATION.

SUBJECT & IDENTITY

- Preserve the exact facial identity, facial structure, skin tone, age appearance, hairstyle, moustache, eyes, nose, lips, jawline and natural facial proportions from the reference image.
- Do not beautify, reshape, slim, widen, age or alter the face.
- Maintain a natural Indian male appearance.
- Chest-up composition.
- Powerful but relaxed posture.
- Head slightly turned toward the left.
- Confident, calm and mysterious expression.
- Natural realistic skin texture.

OUTFIT

- Premium dark charcoal-black utility jacket, fitted but natural.
- Minimal, sophisticated styling.
- Clean collar and realistic fabric texture.
- No unnecessary logos, prints or decorative elements.

ACCESSORIES

- One very thin, elegant polished silver chain around the neck.
- Chain must be minimal, lightweight and subtle, with small fine links.
- The chain should sit naturally close to the neckline.
- NO thick chain, NO Cuban-link chain, NO oversized chain, NO motorcycle-style chain, NO heavy jewelry.
- Small, understated round sunglasses with dark lenses.
- Accessories must remain secondary to the face and overall portrait.

LIGHTING

- Dramatic warm orange backlight creating a refined rim glow around the hair and shoulders.
- Soft controlled key light from the left side of the face.
- Deep but detailed cinematic shadows.
- Natural skin highlights.
- Subtle volumetric amber glow behind the subject.
- Professional studio lighting, similar to a high-end cinematic portrait shoot.

BACKGROUND

- Dark brown-black premium studio background.
- Smooth black-to-dark-brown gradient.
- Soft diffused amber halo directly behind the head and shoulders.
- Minimal background with no distracting objects.
- Elegant cinematic atmosphere.

CAMERA & COMPOSITION

- Vertical 9:16 portrait composition.
- Eye-level camera.
- 85mm portrait lens.
- Realistic professional DSLR/cinema-camera rendering.
- Shallow depth of field.
- Face and eyes remain tack sharp.
- Background smoothly falls into soft cinematic bokeh.
- Chest-up framing with balanced headroom.
- Natural perspective and realistic anatomy.

COLOR & FINISH

- Rich black and warm amber-orange cinematic color palette.
- High contrast but preserve facial details.
- Premium filmic color grading.
- Subtle cinematic grain.
- Realistic skin tones.
- Photorealistic texture.
- No excessive HDR.
- No plastic skin.
- No artificial beauty filter.
- No over-sharpening.

FINAL VISUAL STYLE

Bold, sophisticated, masculine, premium and mysterious cinematic portrait. The image should look like a professional movie-poster/editorial portrait photographed with a high-end cinema camera, not like an AI-generated image.

STRICT NEGATIVE CONSTRAINTS

Avoid oversized jewelry, thick chains, Cuban-link chains, heavy necklaces, motorcycle chains, multiple necklaces, large pendants, chunky accessories, exaggerated muscles, altered facial features, different hairstyle, different moustache, facial beautification, plastic skin, cartoon appearance, unrealistic anatomy, distorted hands, extra fingers, excessive jewelry, distracting background elements, excessive glow, oversaturated orange tones, artificial HDR, low-detail face, blurry eyes.

Aspect Ratio: 9:16

Style: Raw, ultra-realistic, cinematic photography

Quality: High-detail, photorealistic, premium editorial finish


---------------------end

इस Prompt का Visual Look

इस prompt में color palette पूरी तरह बदल जाती है:

Rich Black + Warm Amber + Orange

Background:

Dark Brown-Black

और head के पीछे:

Soft Amber Halo

इसके साथ warm orange rim light hair और shoulders को highlight करती है।

इस वजह से यह image red fashion portrait के मुकाबले ज्यादा cinematic और movie-poster जैसी दिखाई दे सकती है।

Best For

- Movie Poster Style
- Cinematic Portrait
- Personal Branding
- Dark Instagram Aesthetic
- YouTube Thumbnail
- Character Poster
- Professional Creator Portrait


3. Red Neon Aura AI Portrait Prompt


अब तीसरा style पहले दोनों से अलग है।

यह सिर्फ red studio lighting नहीं है।

इसमें bright vibrant glowing red neon aura को hair और shoulders के around create करने के लिए specifically बताया गया है।

इसलिए इसका look ज्यादा:

Neon + Futuristic + Dramatic + Viral

होता है।

Copy-Paste Prompt


A high-quality professional portrait of [Insert Name/Description], looking directly into the camera with a calm expression, ultra-smooth flawless skin, soft dramatic studio lighting.

The background is a soft, deep dark red with a subtle gradient effect, and a bright, vibrant glowing red neon aura outlines the hair and shoulders, creating a striking backlit halo.

Photorealistic, 8k resolution, cinematic atmosphere, sharp focus, highly detailed texture.

End


Red Neon Aura Prompt की खासियत

इस prompt की सबसे बड़ी difference है:

Red Rim Light vs Red Neon Aura

Luxury Crimson prompt में:

Dramatic red rim light

का इस्तेमाल है।

इसका purpose hair और shoulders के edges को controlled तरीके से highlight करना है।

लेकिन Red Neon prompt में:

Bright, vibrant glowing red neon aura

है।

यह एक stronger visible glow create करने की direction देता है।

इसलिए final image ज्यादा eye-catching और social-media friendly हो सकती है।


Red Neon Prompt में Camera को Direct क्यों रखा गया है?

Luxury prompt में subject:

looking past the camera

कर रहा है।

लेकिन Red Neon prompt में:

looking directly into the camera

है।

इससे viewer और subject के बीच direct visual connection बनता है।

यह style profile photos, reels covers और attention-grabbing social media portraits के लिए useful हो सकता है।


तीनों Prompts का Detailed Comparison

Feature| Luxury Crimson| Dark Amber Cinematic| Red Neon Aura
Main Theme| Luxury Fashion| Cinematic Editorial| Neon Portrait
Main Color| Crimson Red| Amber Orange| Vibrant Red
Secondary Color| Black| Rich Black| Dark Red
Background| Crimson Gradient| Brown-Black| Deep Dark Red
Hair Light| Red Rim| Orange Rim| Red Neon Aura
Glow| Controlled| Subtle Amber Halo| Bright Neon Glow
Expression| Confident| Calm & Mysterious| Calm
Eye Direction| Past Camera| Slightly Turned| Direct Camera
Outfit| Black Sweater| Black Utility Jacket| Custom
Accessories| Sunglasses + Hoop| Sunglasses + Thin Chain| Custom
Style| Fashion Editorial| Movie Poster| Viral Neon
Skin| Detailed Texture| Natural Realistic| Smooth / Flawless
Best Use| Fashion| Cinematic| Social Media


क्या Prompt 1 और Prompt 2 में कोई Difference है?

आपके original Prompt 1 और Prompt 2 text बिल्कुल समान हैं।

इसलिए उन्हें दो अलग AI styles नहीं माना जाना चाहिए।

दोनों में:

  • - Same outfit
  • - Same pose
  • - Same background
  • - Same red rim light
  • - Same camera
  • - Same color direction
  • - Same editorial style
  • - Same 9:16 ratio

है।

इस article में उन्हें एक ही Luxury Crimson Fashion Portrait category में रखा गया है।


तीनों Prompts में Color Grading का Difference

यह सबसे interesting हिस्सा है।

Luxury Crimson

Color Palette:

Black + Crimson + Dark Red

Look:

High-contrast luxury fashion

यहाँ “premium color grading” mention है, लेकिन detailed grading recipe नहीं दी गई है।


Dark Amber Cinematic

Color Palette:

Rich Black + Warm Amber + Orange

Look:

Filmic, dark और mysterious

इस prompt में explicitly:

- Premium filmic color grading
- Subtle cinematic grain
- Natural skin tones
- Controlled highlights

दिए गए हैं।

इसलिए इसका color treatment सबसे ज्यादा explicitly defined है।


Red Neon Aura

Color Palette:

Deep Dark Red + Vibrant Neon Red

Look:

Glowing, dramatic और futuristic

यहाँ traditional color-grading instructions कम हैं, लेकिन neon lighting itself image का dominant color treatment बन जाती है।


AI Portrait Prompt में Identity Lock क्यों जरूरी है?

अगर आप reference image का इस्तेमाल कर रहे हैं, तो prompt में identity को clearly define करना useful है।

उदाहरण के लिए:

Preserve the exact facial identity, facial structure, skin tone, hairstyle and natural facial proportions from the reference image.

इस तरह की instructions AI को यह बताती हैं कि आपको केवल “similar person” नहीं बल्कि reference subject की visual characteristics को preserve करने की कोशिश चाहिए।

हालांकि ध्यान रखें:

Prompt में “100% Face Lock” लिखना 100% exact identity की technical guarantee नहीं देता।

Final result AI model, reference image quality और available identity/reference controls पर निर्भर करता है।


AI Portrait Prompt में Lighting कैसे लिखें?

एक strong portrait prompt में lighting को केवल “good lighting” नहीं लिखना चाहिए।

आप light की:

- Direction
- Color
- Intensity
- Position
- Effect

define कर सकते हैं।

उदाहरण:

Red Fashion

Dramatic red rim light around the hair and shoulders.

Cinematic

Warm orange backlight creating a refined rim glow around the hair and shoulders.

Neon

Bright, vibrant glowing red neon aura outlining the hair and shoulders.

तीनों instructions अलग visual results की direction देते हैं।


Background और Lighting को Match करना क्यों जरूरी है?

एक common mistake यह है कि लोग background और lighting को अलग-अलग सोचते हैं।

असल में दोनों को एक visual system की तरह plan करना चाहिए।

Example 1

Crimson Background + Red Rim Light

Result:

Bold luxury fashion

Example 2

Dark Brown Background + Amber Halo + Orange Rim Light

Result:

Cinematic movie-poster

Example 3

Dark Red Background + Vibrant Red Neon Aura

Result:

Neon social-media portrait

यही combination final image का mood काफी हद तक तय करता है।


9:16 Aspect Ratio क्यों इस्तेमाल किया गया है?

इन concepts को vertical content के लिए design किया गया है।

9:16 ratio useful है:

- Instagram Reels
- YouTube Shorts
- Instagram Stories
- Facebook Reels
- Vertical thumbnails
- Mobile-first social media content

Chest-up framing में face को बड़ा और prominent रखने के लिए भी यह format useful है।


Professional AI Portrait बनाने के 8 Tips

1. High-Quality Reference Image इस्तेमाल करें

Face साफ और अच्छी lighting में visible होना चाहिए।

2. Identity Lock को शुरुआत में रखें

Reference-based generation में identity instructions को prompt के शुरुआती हिस्से में रखना practical है।

3. एक Clear Color Palette चुनें

Red, orange, blue और purple सबको एक साथ डालने के बजाय एक dominant palette चुनें।

4. Background और Rim Light Match करें

Red background के साथ red rim और amber background के साथ orange rim ज्यादा cohesive result दे सकता है।

5. Accessories को Limit करें

बहुत ज्यादा accessories face से attention हटा सकती हैं।

6. Negative Constraints इस्तेमाल करें

अगर AI बार-बार unwanted chain, jewelry या artificial skin बना रहा है, तो negative constraints add करें।

7. Skin को Natural रखें

“Ultra-realistic” का मतलब overly smooth plastic skin नहीं होना चाहिए।

8. Multiple Generations Test करें

एक ही prompt से अलग-अलग generations बनाकर सबसे natural और consistent result चुनें।


कौन सा AI Portrait Prompt सबसे अच्छा है?

यह आपकी जरूरत पर depend करता है।

अगर आपको Luxury Fashion चाहिए:

Luxury Crimson Prompt

अगर आपको Movie Poster जैसा Look चाहिए:

Dark Amber Cinematic Prompt

अगर आपको Viral Neon Social Media Portrait चाहिए:

Red Neon Aura Prompt

तीनों में कोई एक universally “best” नहीं है। हर prompt अलग visual objective के लिए बनाया गया है।


AI Portrait Prompt से किन तरह की Photos बना सकते हैं?

इन prompt structures को modify करके आप कई तरह के concepts बना सकते हैं:

- Luxury Fashion Portrait
- Cinematic Movie Poster
- Instagram Profile Photo
- YouTube Thumbnail
- Creator Branding
- Red Neon Portrait
- Dark Editorial Portrait
- Fashion Campaign
- Social Media Cover
- AI Photography Concept
- Personal Branding Image


Frequently Asked Questions

AI Portrait Prompt क्या है?

AI Portrait Prompt एक detailed instruction है जो AI image generator को portrait के subject, identity, outfit, lighting, camera, background और visual style के बारे में बताता है।

Face Lock Prompt क्या होता है?

Face Lock prompt reference image की facial identity और visual characteristics को preserve करने की कोशिश करने वाली instructions का structured हिस्सा है।

Luxury Crimson और Red Neon Portrait में क्या difference है?

Luxury Crimson में controlled red rim lighting और crimson studio background है। Red Neon Portrait में bright glowing red neon aura है, इसलिए इसका glow ज्यादा prominent और dramatic है।

Dark Amber Prompt में कौन सा color इस्तेमाल हुआ है?

इसमें rich black और warm amber-orange cinematic palette इस्तेमाल की गई है।

कौन सा prompt Instagram के लिए अच्छा है?

तीनों 9:16 vertical format में इस्तेमाल किए जा सकते हैं। Fashion content के लिए Luxury Crimson और attention-grabbing social portraits के लिए Red Neon Aura अच्छा starting point हो सकता है।

क्या ये prompts सभी AI image generators में काम करेंगे?

Prompt structure को कई AI image generators में adapt किया जा सकता है, लेकिन output और identity preservation tool/model के अनुसार बदल सकते हैं।

क्या AI Face Lock 100% accurate होता है?

नहीं। Face Lock instructions identity preservation में मदद कर सकती हैं, लेकिन exact identity की absolute guarantee नहीं होती।

Final Verdict

एक professional AI portrait बनाने के लिए सिर्फ subject का नाम या “8K realistic photo” लिखना पर्याप्त नहीं है।

सबसे अच्छे results के लिए आपको Identity + Outfit + Pose + Lighting + Background + Camera + Color Palette + Negative Constraints को एक साथ define करना चाहिए।

इन तीन prompts से आपको तीन अलग visual directions मिलती हैं:

Luxury Crimson
Bold, premium और fashion-focused.

Dark Amber Cinematic
Mysterious, sophisticated और movie-poster inspired.

Red Neon Aura
Bright, dramatic और social-media friendly.

दोस्तो और सबसे महत्वपूर्ण बात यह है कि आप इन prompts को केवल copy-paste करके ही नहीं, बल्कि इनके अलग-अलग components को mix करके भी नए AI portrait concepts बना सकते हैं।

दोस्तो उदाहरण के लिए, Luxury Crimson का outfit लेकर Dark Amber की lighting लगाई जा सकती है, या Red Neon Aura की lighting को किसी futuristic blue background के साथ combine किया जा सकता है।

दोस्तो यही approach आपको हर बार एक नया और unique AI portrait concept बनाने में मदद करेगी ।

AI Portrait Prompt Guide: Face Lock, Luxury Fashion, Cinematic और Red Neon AI Photos बनाने के 3 Best Prompts

दोस्तो Navratri का season आते ही पूरा माहौल devotion और celebration से भर जाता है।
इस festival में लोग traditional outfits पहनकर Garba और Dandiya dance करते हैं, मंदिर जाते हैं और Mata Rani की पूजा करते हैं। इसी divine energy को capture करने के लिए आजकल लोग AI Art Prompts use कर रहे हैं ताकि एकदम cinematic और spiritual images बन सकें।


Discover the best AI prompts for Navratri 2025! Create divine images of Durga Maa, Garba, Dandiya, and traditional festive portraits using Google Gemini, MidJourney, or Stable Diffusion. Celebrate Navratri with powerful AI-generated art.
Prompt Gemini 


🌺 Why AI Prompts for Navratri?

AI prompts allow you to create highly detailed, ultra-realistic images that look divine और festive vibes को और भी grand बना देते हैं। Imagine yourself standing in front of a Durga Maa idol, wearing a traditional kurta-dhoti with tilak, surrounded by temple lights, smoke, and devotional aura – ये सब AI से possible है।


🔥 Top 5 Attractive Prompts

1. Royal White-Golden Look
100% matching uploaded image face powerful young man standing confidently in front of a grand Durga Maa idol. He is wearing a pure white silk kurta with golden embroidery, a cream dhoti, and a rich maroon dupatta draped over his shoulder. A golden wristwatch on his hand, prayer bead bracelet, and a bold red tilak shining on his forehead. Behind him, Goddess Durga glows in her red saree with golden ornaments, multiple arms holding weapons, lion by her side, temple lights and sacred smoke enhancing the divine aura.


2. Traditional Saffron Devotee
100% matching uploaded image face strong young man standing barefoot in front of Durga Maa idol. He is dressed in a saffron-orange kurta with golden borders, white dhoti, and a vibrant red dupatta on his shoulder. A prayer bead bracelet on one wrist, watch on the other, and a large red tilak on his forehead symbolizing devotion. Behind him, Durga Maa radiates divine energy, holding her weapons with a majestic lion and golden temple décor glowing in the background with festive smoke and diya lights.


3. Warrior Ethnic Style (Navy Blue)
100% matching uploaded image face confident young man standing firmly in front of the idol of Durga Maa. He wears a navy blue embroidered kurta with cream churidar, and a bold crimson red stole flowing over his shoulder. His forehead is marked with a bright red tilak, wrist adorned with a watch and rudraksha bracelet. Behind him, Goddess Durga shines gloriously in her red saree, her golden crown sparkling, weapons in multiple hands, with a lion roaring beside her, temple lamps flickering, and smoke adding a dramatic spiritual aura.


4. Festival Royal Black-Golden
100% matching uploaded image face powerful young man standing gracefully in front of the divine Durga Maa idol. He is wearing a jet black kurta with golden embroidery, cream dhoti, and a shining golden-red dupatta draped over his shoulder. His wristwatch gleams, prayer beads rest on his other hand, and a bright red tilak glows on his forehead. Behind him, Durga Maa appears radiant with heavy golden jewelry, her weapons shining, lion standing fierce, and golden lamps lighting up the temple with smoke creating a cinematic Navratri vibe.


5. Spiritual Devotee in Green-Golden
100% matching uploaded image face confident young man standing in devotion in front of Durga Maa idol. He is dressed in a dark green kurta with golden embroidery, white dhoti, and a vibrant saffron dupatta. A rudraksha bracelet and watch on his wrist, forehead adorned with a bright red tilak of faith. Behind him, the grand idol of Durga Maa with multiple arms, glowing weapons, and majestic lion radiates divine energy, surrounded by temple lights, diya flames, and festive smoke, creating a deeply spiritual Navratri atmosphere.


🙏 Top 5 Powerful AI Prompts for Navratri

1. Royal White-Golden Look

100% matching face young man, wearing white silk kurta with golden embroidery, cream dhoti, maroon dupatta, standing before Durga Maa idol. Bold red tilak on forehead, golden lamps glowing, sacred smoke creating a divine aura.

👉 Perfect for those who want a regal and devotional Navratri vibe.


2. Traditional Saffron Devotee

Strong young man in saffron kurta with golden borders, white dhoti, vibrant red dupatta. Prayer beads on wrist, big tilak on forehead. Behind him, Maa Durga with lion and weapons glowing, temple lights shining around.

👉 यह prompt एकदम traditional Bhakti look देता है।


3. Warrior Ethnic Style (Navy Blue)

Young man in navy blue embroidered kurta, cream churidar, crimson red stole. Forehead marked with tilak, wrist adorned with rudraksha bracelet. Behind him Durga Maa with red saree, golden crown, weapons, and roaring lion.

👉 For a modern yet powerful warrior vibe.


4. Festival Royal Black-Golden

Man in jet black kurta with golden embroidery, cream dhoti, golden-red dupatta. Bright red tilak on forehead, watch and prayer beads on wrist. Durga Maa idol behind glowing in divine light, surrounded by lamps and smoke.

👉 एकदम cinematic और festive royal effect देता है।


5. Spiritual Devotee in Green-Golden

Confident young man in dark green kurta with golden embroidery, saffron dupatta, white dhoti. Forehead tilak glowing bright, rudraksha bracelet on wrist. Maa Durga with golden jewelry, weapons, lion and temple lights behind.

👉 For a calm yet deeply spiritual Navratri theme.


Prompt:
A hyper-realistic painting depicting an Indian man standing barefoot before a magnificent statue of Goddess Durga. His face must match the face in the uploaded image 100%. He is wearing a pure white silk kurta with golden embroidery, a cream-colored dhoti, and a deep red embroidered scarf. A deep red tilak on his forehead and glowing temple lamps all around create a royal and divine festive atmosphere.

Prompt:
A hyper-realistic painting depicting an Indian man standing barefoot before a magnificent statue of Goddess Durga. His face must match the face in the uploaded image 100%. He is wearing a pure Red silk kurta with golden embroidery, a Blue-colored jeans, and a deep red embroidered scarf. A deep red tilak on his forehead and glowing temple lamps all around create a royal and divine festive atmosphere.


Prompt 
100% matching Upload image face powerful young man standing confidently in front of a grand Durga Maa idol. He is wearing a traditional black kurta with a vibrant red dupatta draped over his shoulder, a watch on his wrist, and a prayer bead bracelet. His forehead is marked with a bright red tilak, symbolizing devotion. Behind him, Goddess Durga is depicted in all her glory with multiple arms holding divine weapons, adorned with an ornate crown, heavy jewelry, and a red saree decorated with gold patterns. The atmosphere is filled with soft smoke, festive lights, and a divine aura, creating a strong spiritual and cultural vibe.


🌟 How to Use These Prompts?

1. Copy the prompt.


2. Paste in your favorite AI Art Generator Google Gemini Banana 🍌 Prompt image selec करे और अपना इमेज अपलोड करे। उसके बाद आपको जो prompt पसंद है उसे डालकर आप सबमिट करके अपनी फेस वाली इमेज जेनरेट कर सकते है ।

3. Add small details according to your choice (background temple style, lighting, color).


4. Generate multiple variations until you get the perfect Navratri artwork.

 Final Thoughts

Navratri सिर्फ एक festival नहीं है, ये faith और energy का celebration है।
जब आप AI prompts के जरिए अपने cultural outfits और Maa Durga की भक्ति को art में बदलते हैं, तो ये सिर्फ digital art नहीं बल्कि spiritual experience बन जाता है।

This Navratri, try these prompts and create your own divine AI portraits.
Happy Navratri! 🌸🔥

Navratri Special: AI Generated Divine Garba & Durga Maa Prompts

दोस्तो अगर आप एक content creator हो या AI enthusiast, तो यह blog आपके लिए perfect है! यहाँ आपको मिलेगा पूरा process जिसमें आप अपना खुद का AI Avatar बना सकते हो और एक engaging Podcast scene create कर सकते हो जिसमें एक talking monkey आपका guest हो! 

monkey podcast ai video  talking monkey ai video  ai podcast with animal  HindiTechKnow with AI  funny AI podcast  tech podcast India  AI tools in Hindi  comedy tech video  AI generated video with monkey  podcast with monkey interview
Monkey AI Podcast


🧩 Part 1: अपना AI Avatar कैसे बनाएं – Step by Step

✅ Step 1: अपनी एक clear selfie या image upload करो

अपनी एक ऐसी photo लो जिसमें आपका face clearly दिख रहा हो — front-facing और अच्छे lighting में हो। इस image को AI tools में reference के लिए use किया जाएगा।

✅ Step 2: Use करो AI Image Prompt

आप ChatGPT या Midjourney जैसे AI image generators में यह prompt use कर सकते हो:

Prompt:

एक hyper-realistic cinematic portrait बनाओ एक confident South Asian male का जो एक modern white studio में खड़ा है, background में glowing LED lights हैं। उसने black hoodie और dark jeans पहनी है, और पीछे एक glowing neon sign है जिसमें लिखा है "HindiTechKnow with AI"।


HindiTechKnow with AI की जगह आप अपने चैनल का नाम या फिर।और भी कुछ नाम ऐड कर सकते है ।


✅ आप चाहो तो sunglasses या अलग fashion style भी prompt में add कर सकते हो:

Prompt (with sunglasses):

" He is wearing stylish black sunglasses, confident expression के साथ camera में देख रहा है।"


🧠 Part 2: Monkey के साथ Podcast Scene कैसे बनाएं

अब बात करते हैं थोड़ा fun content बनाने की! अपने avatar के साथ एक funny guest को add करो — एक talking monkey! 🎙️

monkey podcast ai video  talking monkey ai video  ai podcast with animal  HindiTechKnow with AI  funny AI podcast  tech podcast India  AI tools in Hindi  comedy tech video  AI generated video with monkey  podcast with monkey interview
AI Image 


AI Avatar और Podcast Scene कैसे बनाएं – Step by Step Hinglish Guide


✅ Step 1: Podcast Setup Prompt

Prompt:

एक modern podcast studio का scene है जहाँ एक South Asian tech creator और एक monkey (orange scarf में) table के दोनों तरफ बैठे हैं। background में LED lights और एक glowing neon sign है जिसमें लिखा है “HindiTechKnow with AI।” दोनों के सामने microphones लगे हुए हैं।


✅ Monkey expressive है और host (आपका avatar) confident लग रहा है।


🎤 Part 3: AI Video कैसे बनाएं (RunwayML या Pika Labs से)

🎬 Video Prompt (Monkey speaks first):

"आपका avatar podcast में बैठा है, और monkey animated style में बात करता है। Host (आप) interest के साथ सुनते हैं, smile करते हैं, और react करते हैं। Camera slow zoom करता है, lighting cinematic है, और expressions natural हैं।"


🎬 Alternate Prompt (आप पहले बोलते हो):

> Host mic में confidently बोलता है, monkey ध्यान से सुनता है। दोनों के expressions clear हैं और environment एक engaging podcast setup का feel देता है।


🎭 Sample Dialogue (Use in Animation):

Monkey: “नमस्ते दोस्तों! अब मैं भी Reels और AI tools से video बनाता हूँ!”

आपका Avatar: “वाकई! लगता है अब बंदर भी tech expert बन रहे हैं!"

🔧 Tools Required:

Image Generation: Midjourney, Leonardo AI, Bing Creator

Video Creation: RunwayML, Pika Labs

Voiceover (optional): ElevenLabs, D-ID

Conclusion 

दोस्तो यह पूरी जानकारी मैने आपको शॉर्ट में गाइड कर दी है और जिससे आपको आसानी से समझने और इन सभी Prompt को ChatGPT और फिर Runway से उसे करके इमेज और वीडियो को ready कर सकते है ।

दोस्तो जानकारी पसंद आई हो तो आप और भी लोगो को इसे शेयर करे जिससे लोगों को इसका knowledge मिले और वो भी एक Faceless Video Ready कर सकते है ।

Step-by-Step Guide: अपना AI Avatar और Podcast Scene कैसे बनाएं ChatGPT & AI Tools के साथ

आज हम इस ब्लॉग में बात करेंगे डिजिटल मार्केटिंग के बारे में और उससे जुड़े कुछ महत्वपूर्ण टिप्स के बारे में। इन टिप्स की मदद से आप अपने ब्लॉग को उभारने में सक्षम होंगे । इस ब्लॉग को कैसे बेहतर बनाना है आप इन टिप्स के जरिये सिख सकते है ।

Blogging  Digital Marketing  Content Marketing   SEO   Social Media Marketing  Email Marketing  Video Content  Guest Posting   Blog Promotion   Blogging Community, #BloggingTips  #DigitalMarketing  #ContentStrategy   #SEOTips  #SocialMediaPromotion  #EmailMarketingCampaigns   #VideoContentCreation  #GuestBlogging  #BlogPromotionIdeas  #BloggingCommunity
digital markeing with blogger

सेम का उपयोग करें: डिजिटल मार्केटिंग में खोज इंजन मार्केटिंग (Search Engine Marketing - SEM) का उपयोग करके अपने ब्लॉग को अधिक दिखाएं। अच्छी तरह से रिसर्च करें और अपने लेखों के लिए उचित और लोकप्रिय कीवर्ड्स का उपयोग करके अपने आर्टीकल में इसे यूज़ करें ।


सोशल मीडिया का सही इस्तेमाल करे: सोशल मीडिया आपके ब्लॉग को व्यापक रूप से प्रचारित करने का एक अच्छा माध्यम है। आप अपने ब्लॉग के लेखों को अपने सोशल मीडिया प्रोफाइलों पर शेयर करके उन्हें अधिक लोगों तक पहुंचा सकते हैं।


कंटेंट को ध्यान से लिखें: अपने ब्लॉग के लेखों को ध्यान से लिखें और उन्हें विशेषज्ञों द्वारा बेहतर जानकारी के साथ भरें। अच्छा कंटेंट आपके वाचकों को आकर्षित करेगा और आपके ब्लॉग को अधिक विश्वसनीय बनाएगा। जिससे आपके फॉलो लोग आप से जुड़े रहेंगे ।


वीडियो और ग्राफिक्स का उपयोग करे: आप अपने ब्लॉग पोस्ट में वीडियो और ग्राफिक्स का उपयोग करके उन्हें और अट्रेक्टिव बना सकते हैं। वीडियो से लोग अधिक जुड़ते हैं और ग्राफिक्स बेहतर रूप से समझाने में मदद करते हैं।


10 Essential Tips for Boosting Your Blog with Digital Marketing


अपने लेखों को अनुकूलित करें: अपने लेखों को अपने टारगेट ऑडियंस के अनुकूलित करें। आपको अपने वाचकों की आवश्यकताओं और रुचियों को समझने की कोशिश करनी चाहिए और उन्हें उनके इंटरेस्ट के अनुसार लेखें बनाने चाहिए। आपकी ऑडियंस को क्या पसंद है वह लिखे ।


रेगुलर अपडेट्स: अपने ब्लॉग को रेगुलर अपडेट करें। नए और रोचक लेखों को समय-समय पर पोस्ट करके अपने वाचकों को रुचिकर बनाए रखें। रेगुलर ब्लॉग लिखने से आपके वाचक आपसे जुड़े रहेंगे ।


ब्लॉग न्यूजलेटर चलाएं: अपने ब्लॉग के लिए एक न्यूजलेटर चलाने से आप अपने वाचकों के साथ नियमित संवाद स्थापित कर सकते हैं। इसमें आप नए लेखों, ऑफर्स, या किसी विशेष घटना से जुड़ी जानकारी शामिल कर सकते हैं।


ब्लॉग के लिए गेस्ट पोस्ट लें: अपने ब्लॉग पर गेस्ट पोस्ट को आमंत्रित करके आप अपने ब्लॉग के लिए नए और विशेषज्ञ लेखकों को शामिल कर सकते हैं। यह आपके ब्लॉग को नए लोगो तक पहुंचाने में मदद करेगा और आपके वाचकों को विविधता प्रदान करेगा।


बैकलिंक बिल्डिंग: आपके ब्लॉग को अधिक विश्वसनीय बनाने के लिए अन्य वेबसाइट्स से बैकलिंक्स प्राप्त करें। यह आपके ब्लॉग के रैंकिंग को बढ़ाने में मदद कर सकता है और आपको अधिक ट्रैफिक प्रदान कर सकता है।


अपने वाचकों के साथ संवाद स्थापित करें: अपने ब्लॉग पोस्ट के नीचे कमेंट सेक्शन का उपयोग करके अपने वाचकों के साथ संवाद स्थापित करें। उनके प्रश्नों का उत्तर देने, उनके विचारों को समझने, और उनके सुझावों को ध्यान में रखने से आप अपने ब्लॉग को और उत्कृष्ट बना सकते हैं।


उम्मीद है कि ये टिप्स आपको अपने डिजिटल मार्केटिंग के सफलता के मार्ग में मदद करेंगे। अपने ब्लॉग को बेहतर बनाने के लिए इन टिप्स का उपयोग करें और अपने वाचकों को और अधिक लुभाएं। धन्यवाद दोस्तो और हमारे साथ बने रहें।

डिजिटल मार्केटिंग: अपने ब्लॉग को उभारने के लिए 10 महत्वपूर्ण टिप्स

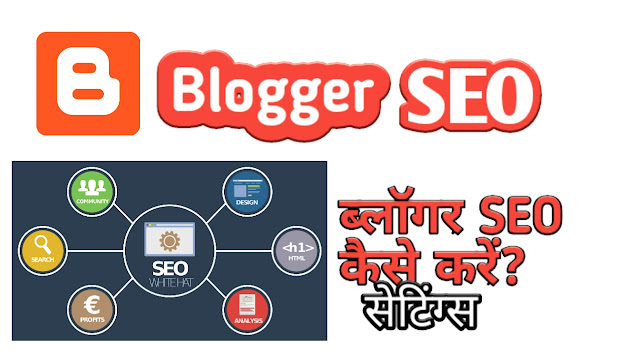
दोस्तो अगर आपको ब्लॉग लिखना स्टार्ट करना है तो आपको उससे पहले आपको Blogger SEO setting kaise kare आपको यह सेटिंग को करना जरूरी है जिससे आपका ब्लॉग या वेबसाइट गूगल पर रैंक करें । दोस्तो इससे पहले मैंने आपको Blogger website कैसे बनाये उसकी पूरी जानकारी दी है । अगर आपको सीखना है कि Blog Website कैसे बनाये तो आप नीचे डिस्क्रिप्शन पर लिंक पर। क्लिक करके पूरी जानकारी पा सकते है ।


Blogger SEO kaise kare, seo setting, blogger website,website design, seo website, blogger seo setting kaise kare
Blogger SEO


Blogger SEO setting kaise kare

दोस्तो अगर आपने अपने ब्लॉग पर कस्टम डोमेन लगा लिया है और अगर आप ने Blogger पर Custom Domain ऐड नही किया है तो आप हमारे ब्लॉग के इस आर्टिकल से सिख सकते है कि आप Blogger में Custom Domain कैसे ऐड करे । दोस्तो उसके बाद आपको यह SEO सेटिंग करनी बहुत जरूरी है जिससे आपका ब्लॉग वेबसाइट गूगल पर रैंक जरूर करेगा । आज मे आपको Blogger SEO Tips दे रहा हु जिसकी मदद से आप आपकी वेबसाईट गूगल पर रैंक जरूर करेगी । 


Blogger SEO Setup kaise kare step by step


SEO (Search Engine Optimization) का Setup करके आप अपने Blogger ब्लॉग अपने गूगल के सर्च मे ला सकते और अच्छी रैंक कर सकते है । Organic Traffic Increase कर  सकते है । आप नीचे दिए गए स्टेप को फॉलो करके आप अपने Blogger ब्लॉग के लिए SEO Settings को सेट कर सकते है । 


दोस्तों आपको सबसे पहले Blogger अकाउंट मे Login करें और Dashboard मे जाए । उसमे आपको सेटिंग पर क्लिक करना है । 

सेटिंग पर क्लिक करने के बाद आपको Basic सेक्शन मे Title के नीचे Blogger Description का ऑप्शन है उसमे आपको क्लिक करके आप जिस टॉपिक पर ब्लॉग लिखे रहे है । उसके रेलेटेड Description लिखना है । उसमे आप 500 वर्ड तक का Blogger Description लिख सकते है । 


Blogger me SEO , seo, blogger, seo setting, seo setting in hindi, blogger seo setting, blogger website setting
Blogger SEO


Basic ऑप्शन में आपको Publishing Section में ब्लॉग एड्रेस के सामने Edit ऑप्शन पर क्लिक करें ।

"Search preferences" के ऑप्शन पर क्लिक करें ।

अब आपको कुछ Important SEO settings सेट करनी होगी ।


Blogger me Custom Domain kaise add kare?


Blogger SEO setting kaise kare: Step-by-Step Guide


Meta description: 

Meta description आपको अपने ब्लॉग के लिए एक  Attractive और relevant लिखना है , यह Description Search Engine रिजल्ट में आपके ब्लॉग के साथ नीचे दिखता है । Meta डिस्क्रिप्शन 150 कैरेक्टर्स  से कम का होना चाहिए । आपका ब्लॉग जिस टॉपिक पर उसके रिलेटेड ही डिस्क्रिप्शन लिखे ।


Blogger me SEO Setting kaise kare, blogger meta tags, meta tags setting, blogger setting, website seo settting


Custom robots header tags: 

इस ऑप्शन को Enable करें और "All"  ऑप्शन सेलेक्ट करें । यह Search Engines को आपके ब्लॉग के पेज को Index करने के लिए Permission देते है । इमेज मे आपको जैसे दिख रहा है उसी प्रकार आपको  Custom robots header tags की सेटिंग करनी है । 


Blogger SEO, SEO Setting kaise, Blogger Setting, Custom Robots HEader
Blogger SEO


Custom robots.txt: 

इस ऑप्शन को Enable करें । यह आपकी ब्लॉग के लिए एक robots.txt फ़ाइल Generate करेगा  जो Search Engines को आपके ब्लॉग के पेज को Crawl करने के लिए instructions देता है ।


Blogger SEO, Blogger, Google Setting, SEO Setting, Blogger me SEO Setting kaise kare
SEO Setting


दोस्तो नीचे कुछ Examples में आपको दे रहा हु की आप Robots.txt में आप क्या क्या add कर सकते है । आप इनमें से जो आपको Crawl करना है वह ही ऐड करे यानी इनमे से कोई एक ऐड करना है ।


Allow all robots to crawl your blog:

User-agent: *

Disallow:

Allow: /

Sitemap: https://www.example.com/sitemap.xml

----------------------------------------------------------------------------------------------------------

Disallow all robots from crawling your blog:

User-agent: *

Disallow: /

------------------------------------------------------------------------------------------------------------

Disallow certain pages from being crawled:

User-agent: *

Disallow: /page1.html

Disallow: /page2.html

-------------------------------------------------------------------------------------------------------------

Disallow certain folders from being crawled:

User-agent: *

Disallow: /folder1/

Disallow: /folder2/

---------------------------------------------------------------------------------------------------------------

Set crawl delay for all robots:

User-agent: *

Crawl-delay: 10

----------------------------------------------------------------------------------------------------------------

Note: Crawl delay का उसे करके आप Search Engines को बताते है कि कितने Seconds के बाद आपके ब्लॉग के पेज को Crawl करना है । इससे आपके Server को Overload होने से बचाया जा सकता है । 


आपको अपने ब्लॉग के Custom Robots.txt फ़ाइल में Relevant Instruction ऐड करनी चाहिए जिससे आपके ब्लॉग के Pages Search Engine के सही से index हो सकें । इसमें आपको सिर्फ Relevant Pages और Directories को Disallow करना चहिये और Robots को आपके ब्लॉग के Important pages को Crawl करने के लिए Permission देना चाहिए ।


How to Submit Website in Google Search Console in Hindi


यह सब सेटिंग पूरी करने के बाद "Save changes" बटन पर क्लिक करें ।


आप आप अपने ब्लॉग के लिए एक Sitemap Generate करना चाहते है तो इसके लिए , "Posts and comments" ऑप्शन के सामने "Edit" ऑप्शन पर क्लिक करें ।


"Enable" ऑप्शन को सेलेक्ट करें Sitemap के सामने और "Save changes" ऑप्शन पर क्लिक करे ।


दोस्तो अब आपका ब्लॉग Search Engine के लिए optimize हो गया है । आप अपने ब्लॉग के कंटेंट में कीवर्ड्स का यूज़ करके और साथ मे अपने ब्लॉग को सोसिअल मीडिया पर शेयर करें । ताकि आपके ब्लॉग की Visibility को और भी बड़े और Google के सर्च रैंकिंग में अच्छी तरह से आये । 


दोस्तो आप ऊपर दिये गए सभी स्टेप को। Follow करके आप आप Blogger में SEO Setting सेट करके आप अपने ब्लॉग को Google के सर्च इंजन में उसकी visibility बढ़ा सकते है ।

Blogger SEO Setting: Complete Guide | ब्लॉगर सेटिंग कैसे करें ?

दोस्तो अगर आप अपने ब्लॉगर में अपनी खुद का डोमेन ऐड करना चाहते है तो आप यहाँ पर Blogger में Custom Domain Setup किस तरह से  Add करना है वो आप यहाँ स्टेप बाइस आपको बताएंगे ।


Blogger में Custom Domain Setup
Blogger Setup Domain in Godaddy

How to Use Custom Domain Name for Blogger 

Step By Step in Hindi


दोस्तो सबसे पहले आपको अपने Desired Custom Domain के लिए एक Domain Name खरीदना होगा आप Popular Domain Registrar Websites जैसे कि GoDaddy, Hostinger, या Google Domains का यूज़ करके इन वेबसाइट से Domain खरीद सकते है ।


दोस्तो डोमेन खरीदने के बाद आपको अब ब्लॉगर में वह Domain को ऐड करना है फिर उसके बाद आपको Blogger एकाउंट में लॉगिन करें और Mein dashboard में जाये ।


अगर आपको ब्लॉगर में Account नही बना है तो आप नीचे लिंक से हमारी वेबसाइट पर जाकर उस लिंक पर क्लिक करके स्टेप फॉलो करके सिख सकते है ।


Blogger मे free website कैसे बनाए ?


उसके बाद दोस्तो आपको लेफ्ट साइडबार में Setting के ऑप्शन पर क्लिक करना है । आपको नीचे जाएंगे तो आपको Publishing मे Custom domain का ऑप्शन दिखेगा उस पर क्लिक करना है?

custom domain, custom domain setup, Blogger custom domain setup
custom domain blogger


आपको अपने कस्टम डोमेन नाम को एंटर करना होगा, जैसे कि उदारण के तौर पर "www.itihaspedia.in"


Custom Domain Name for Blogger, blogger domain setup
Custom Setup domain

Domain ऐड करने के बाद "Save" बटन पर क्लिक करें । जिससे आपको एक Errorमैसेज Show करेंगा । जो आपको बताएगा कि आप CNAME रिकॉर्ड ऐड करना है आपने जिस वेबसाइट पर से Domain को खरीदा है । 


Blogger मे custom domain कैसे Setup करें
domain setup in blogger

उस वेबसाइट पर से आपको अपना CNAME ऐड करना पड़ेगा  दोस्तो मैंने अपना Domain Godaddy  से खरीदा है तो में वहाँ से अपना डोमेन में CNAME ऐड करूँगा ।


godaddy dns setting, godaddy me cname setup
godaddy dns setting


दोस्तों आपको Godaddy login कर लेना है आपको अपनी Product सेक्शन मे चले जाना है आपको वह आपको Domain दिखाई देगा उसमे राइट साइड आपको DNS का ऑप्शन पर क्लिक करना है । 

Blogger मे custom domain कैसे Setup करें ? | ब्लॉगर मे डोमेन कैसे ऐड करें ?

जब आप DNS पर क्लिक करेंगे तो आपको एक नया पेज खुलेगा उसमे आपको ऊपर दिए गए इमेज मे आपको उस सेक्शन मे आना है फिर CNAME पर आपको एरर जो है वो एडिट करना होता है । 


Blogger मे custom domain कैसे Setup करें ? | ब्लॉगर मे डोमेन कैसे ऐड करें ?
cname setup 

CNAME1: Host Name: "www", Value: "ghs.google.com"


जब आप Domain Registrar Account में Login करें और DNS Settings में जाएं । आपको CNAME Records ऐड करना है जो आपको आपकी ब्लॉगर की स्क्रीन में Error show होगा । आपको अपने जो एरर Show हो रहा है उसे आपको अपने डोमेन रेस्ट्रेशन जैसे कि में Godday में यह सेटिंग सबमिट करूँगा । 


How to Use Custom Domain Name for Blogger


CNAME2: Host Name: "xyz123", Value: "gv abcdefghijklmno.park.domain.com" 

(Note: xyz123 की जगह आपको अपना डोमेन लिखना है जो आपने Domain प्लेटफार्म से खरीदा होगा । और domain.com की जगह आपको अपना। रजिस्टर डोमेन एंटर करना होगा )

Step 8: CNAME रिकॉर्ड add करने के बाद Settings ऑप्शन में वापस जाये "Save" बटन पर क्लिक करें ।


How to Use Custom Domain Name for Blogger
How to Use Custom Domain Name

अब आपको नीचे Redirect domain का ऑप्शन है उसे भी आपको on कर देना है । 

अब आपको उसके नीचे  "Edit" बटन के सामने , "HTTPS Availability" ऑप्शन को अनेबल करें ।


HTTPS Availability
Blogger में Custom Domain Setup


"Save" बटन पर क्लिक करें और कुछ समय के लिए Wait करें । आपको कम से काम 1 घंटा इंतजार कर सकते है ताकि जो अपने चेंज किया है वो अपडेट हो सके ।

Congratulations! आपने अपने ब्लॉगर वेबसाईट मे एक Custom Domain को add कर  लिया है । अब आप अपने readers के साथ अपने ब्लॉग वेबसाईट को शेयर कर सकते है । और अपने ब्रांड और Online Presence को आगे बड़ा सकते है ।

Blogger मे custom domain कैसे Setup करें ? | ब्लॉगर मे डोमेन कैसे ऐड करें?

दोस्तो अगर आप को एक Blogger Website बनना चाहते है और एक नया ब्लॉग शुरू करना चाहते है, तो एक फ्री वेबसाइट बनाने के लिए आपको कुछ स्टेप को फॉलो करना होगा । Blogger website kaise banaye | मोबाइल पर ब्लॉग वेबसाईट कैसे बनाये


blogger website create, Blogger, Wordpress,
Blogger Website


Blogger में Free Website कैसे बनाएं ?


दोस्तो आपको सबसे पहले एक Blogging Platform को चॉइस करना होगा । एक ऐसा प्लेटफार्म को चुने जसमे आपको Free hosting और एक SubDomain मिलेगा । आपको कुछ Popular Platforms है । जैसे की WordPress, Blogger, Wix, Weebly, etc.


ब्लॉगर वेबसाईट को Google Search Console सबमिट कैसे करें ?


khud ki website kaise banaye


जैसे जी ब्लॉगर आपको फ्री में ब्लॉग और फ्री होस्टिंग प्रोवाइड करती है । आप उसकी मदद से फ्री होस्टिंग के साथ साथ उसके Domain जो हम Subdomain प्रोवाइड करती है और अगर आपको अपने Domain यूज़ करके ब्लॉगर में आपका डोमेन यूज़ करके ब्लॉग बना सकते है ।


Blogger website बनाने के स्टेप 

आपको Google मे जाकर Blogger सर्च करना है उसके बाद आपको उस पर क्लिक करना है । 

Blogger कैसे
Blogger Website


दोस्तो अगर आपने Blogger सेलेक्ट किया है, तो आपको उसके लिए Gmail Account की जरूरत पड़ेगी। अगर आपको Gmail Account kaise banate hai, यह जानना है तो आपको नीचे लिंक पर क्लिक करके आप पूरी जानकारी पा सकते है।  दोस्तो आप Blogger की Website पर विजिट करें। और फिर "Create Your Blog" बटन पर क्लिक करें ।

Blogger, Wordpress, Free Webisite, Blogger Website
Create Your Blog


Gmail Account कैसे बनायें?


उसके बाद एक नया आगे खुलेगा जिसमे आपको अपने Gmail Account से Sign in कर देना है ।


Blogger, Wordpress, free Website, Blogger Website
Gmail Account Login

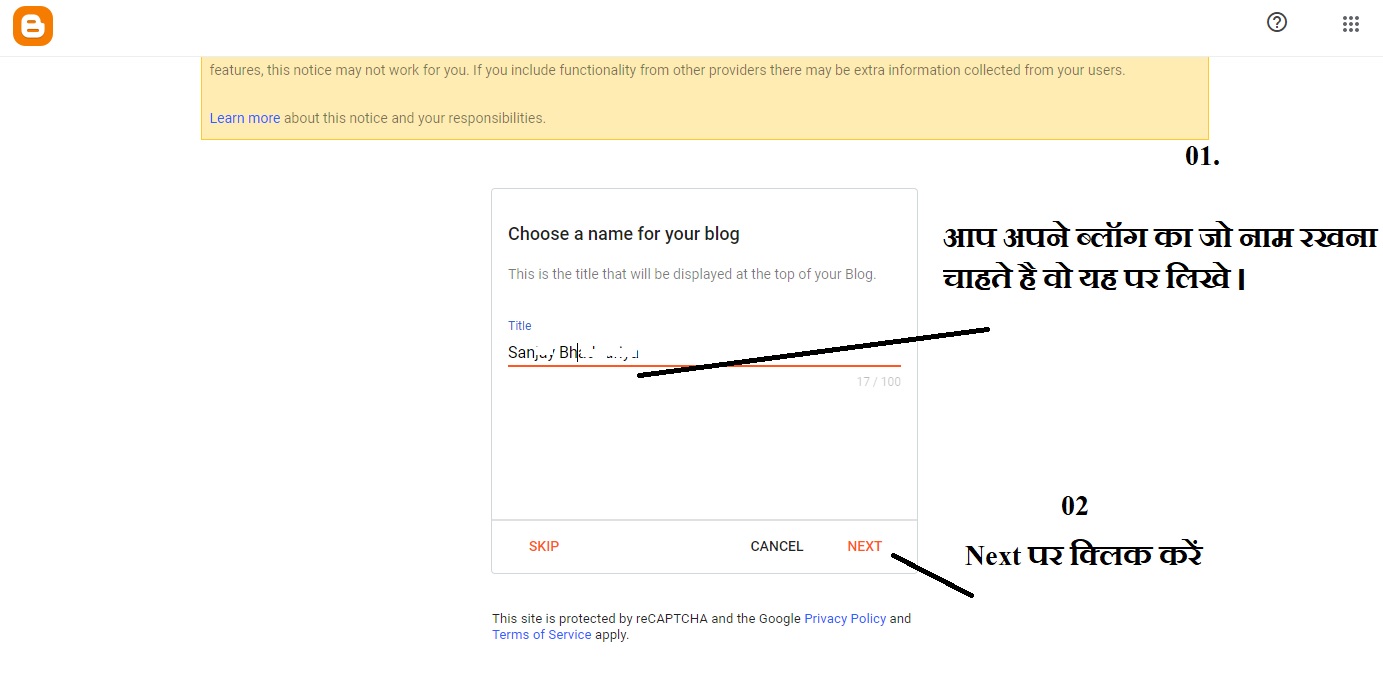
अब आपको एक टाइटल सेलेक्ट करना है जो आप अपने पसंद का रखना चाहते है । वो टाइटल यहाँ पर लिखे । आप अपने ब्लॉग का नाम जो रखना चाहते है वो यहा पर लिखे । 

blogger , Wordpress , Blogger Website , Free Website
Blogger Website name 


उसके बाद URL एड्रेस सेलेक्ट करना होगा जो आप अपने ब्लॉग के लिए रखना चाहते है । आपको एक Unique टाइटल एड्रेस रखना है । जिससे आपके ब्लॉग की पहचान और Recognition हो । आपको वो URL एड्रैस यहाँ लिखना है  जो किसी और ने नहीं रखा हो । 


blogger, mobile par blog, mobile website, blogger website
URL Adress website


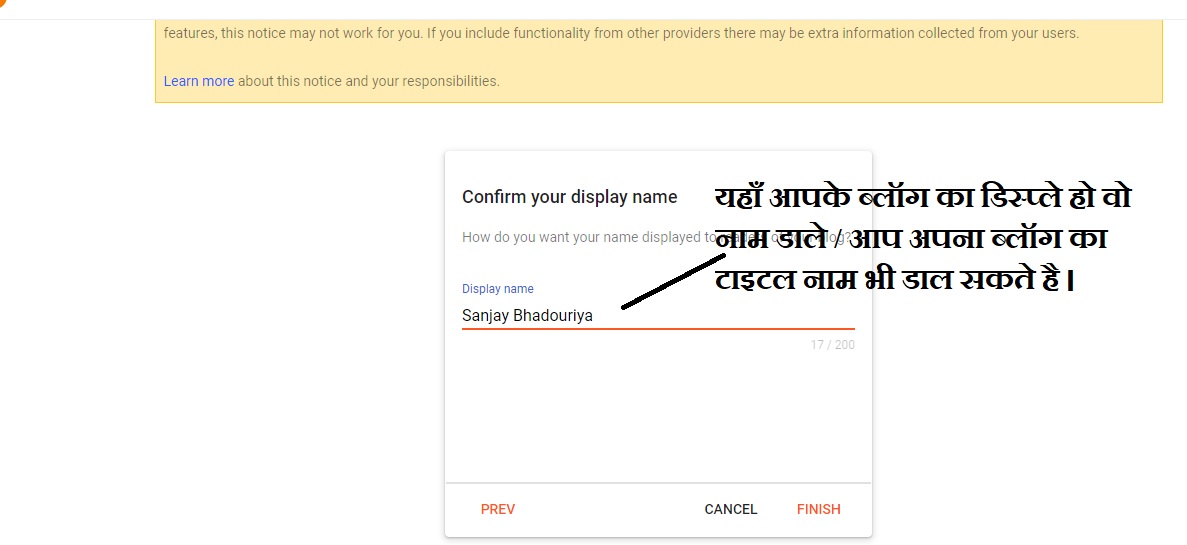
आपको अपने टाइटल जो सलेक्ट किया भी वो रखे आप एक जैसा नाम भी रख सकते है ।


blogger, wordpress, blogger website, mobile website


नाम सिलेक्ट करने के बाद आप Finish पर क्लिक कर दे उसके बाद आपको Theme ऑप्शन सिलेक्ट करें । 


blogger, Blogger Theme , Blogger online free theme
Blogger Theme


अब आपको एक Theme सिलेक्ट करनी है , आप अपने ब्लॉग के लिए एक  Attractive और Professional Theme चॉइस कर सकते है । 


Blooger , Theme, Blogger Free Theme,
Blogger Theme


अब आपका ब्लॉग रेडी है और आप लिखना शुरू कर सकते है । आप अपने ब्लॉग मे पोस्ट लिखकर पब्लिश कर सकते है , और अपने रीडर्स के कमेन्ट को मैनेज कर सकते है , अपने ब्लॉग को डिजाइन और कस्टमाइज़ कर सकते है । 


Blogger, Google Post, Blogger Post
Blogger Post


दोस्तों आप उपर दिए गए स्टेप को फॉलो करके एक फ्री Blogger Website रेडी कर सकते है और अपने Thoughts और ideas लोगों को शेयर कर सकते है । 

Blogger website kaise banaye | मोबाइल पर ब्लॉग वेबसाईट कैसे बनाये